Introduction
Being an electronics engineer, I enjoy a profession which does not
provide for much physical workout, except maybe an occasional climb
up an antenna tower... And, a long time ago, I practiced some windsurf,
but climatic changes have made windy days scarse.
 Combining windy days, with professional activities and with the wife's
occupations has become nearly impossible. So the search for a new
passtime started, and the idea of paddling appeared on the horizon.
Combining windy days, with professional activities and with the wife's
occupations has become nearly impossible. So the search for a new
passtime started, and the idea of paddling appeared on the horizon.
I'm sure I wouldn't have reached a happy ending without the help of a
few friends on the 'net. I'm also glad the indications on these pages
we helpful to others. Here are some pictures I received.
IMPORTANT! This is surely not a project for beginners! It's necessary
to improvise in many situations. Maybe most importantly, as designer
Nick Schade mentions on his page, this design is very complicated to
assemble. I freely admit there were several times I thought I wouldn't
make it.
The info on these pages is free, and provides no garantee at all! I do
not have that much time to spare to attend to basic construction details.
Pages
- Plans - usage
- This page describes the plans, or better, the tables necessary to
draw the actual plans, and an image that shows how to cut the parts
from the plywood. All measures are converted to millimeters. If you'd
rather work with English units, download them from Guillemot Kayaks.
- Preparing the wood
- Almost three plates of 4 mm plywood are necessary to obtain the 5.2 m
necessary to cut the parts. Here's how they are spliced and cut.
- Molde, corte y costura de las partes
- After splicing, the drawing has to be transferred to the wood, and
very carefully cut. Then it's time to start the stiching.
- Introducing epoxies
- Learning how to use epoxy - a project by itself...
- Construction of both halves
- More pictures of the construction, particularly the upper half.
Once both are ready, the insides are painted with epoxy.
- Joining both halves
- Joining both parts sounds easier than it really is. To get a feeling
how the result would be, I temporarily joined both deck and bottom
using duct tape. I also cut the opening for the cockpit (which was
modified later) to be able to glue the inside.
- Glassfibres
- Next step is covering the exterior with glass cloth in two stages.
This is not too difficult, just requires a lot of patience
- Cockpit
- It was too tempting to try and make a cockpit resembling those
preferred by Nick Schade of Guillemot Kayaks. So I devised a way to
modify the existing hole and invented a hybrid design.
- Extras - paddles and more...
- With the end in sight, I started worrying about paddles. After the work
on the hull, I thought that making a few paddles wouldn't be that
difficult.
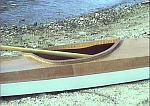
- And finally, the water
- After lots of hours, launch! Incredible...
- Hatches and bulkheads
- After a good year of intensive use, the presence of bulkheads is felt,
to ease rolls and rescues far from shore. And this almost forces
the installing of hatches. Oh, well...
59464
|
(c) John Coppens ON6JC/LW3HAZ |
mail |

